
 admin
A finger-knit statement necklace is a quick, customizable craft made with fabric yarn and no knitting needles. The finger-knitted cord takes about 30 minutes to make, and the finished necklace can be ready in just over an hour. Choose a printed yarn and a contrasting solid color to create a bold accessory that suits your style.
Materials for a Finger-Knit Statement Necklace
You’ll need only a small amount of yarn for this project. Fabric yarn with a consistent thickness is easier to work with, while jersey cotton strips can also be used if cut into yarn-like lengths.
- Printed fabric yarn
- Solid fabric yarn in a contrasting color
- Scissors
Before beginning, make sure the yarn can move comfortably around your fingers without being pulled too tight. Keeping the loops even helps the finished cord look consistent.
How to Finger Knit the Necklace Cord
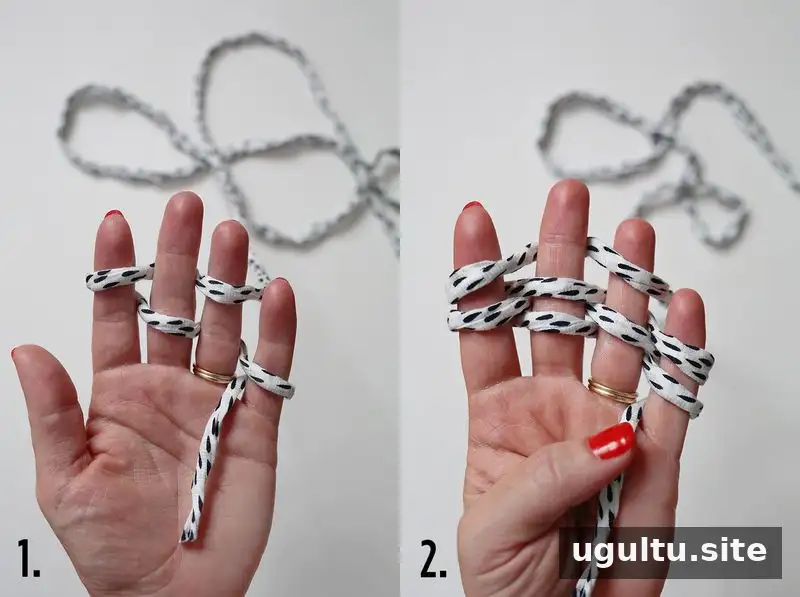
Step 1: Tuck the yarn end between your ring and pinky fingers. Wrap it around your pinky and under your ring finger, over your middle finger, under and around your pointer finger, under your middle finger, and over your ring finger. This creates the first two rows.
Step 2: Repeat the same path: around the pinky, under the ring finger, over the middle finger, under and around the pointer finger, back under the middle finger, and over the ring finger. Let the working yarn hang down. You now have two more rows.
Step 3: Hold the yarn tail against your hand with your thumb. Starting at your pinky, lift the lower loop over the top of the finger. Do the same on your ring and middle fingers.
Step 4: Bend your fingers slightly if needed as you move each loop over. Work gently to avoid stretching or snapping the yarn.
Step 5: Add two more rows by wrapping the working yarn across your fingers as before. Lift the lower loops over the upper ones. Pull the tail toward the back of your hand and snug it down; this end will be knotted later.
Step 6: Continue knitting for about 30 minutes, pulling the tail every few rows so the cord curls into a rope. Make approximately 33 inches of cord, not including the tail.
Step 7: To finish the cord, cut a tail about 6 inches long and thread it through the loops on each finger. Pull it tight.
Step 8: Tie a single knot at each end to secure the loops.
Shape and Finish the Necklace
Step 9: Tie three large, slightly loose knots in the center of the cord.
Step 10: Tie a slightly tighter knot on either side of the center knots. Keep the knots facing the same direction; you may need to work backward when tying the knots on the left.
Step 11: Cut two pieces of solid fabric yarn, each about 3 feet long. Loop them through two loops beneath the knot at one end of the cord, centering the strands.
Step 12: Take one solid strand and wrap it tightly around the other three strands and the printed-yarn tail. Continue for about 4 inches.
Step 13: Knot all four strands together and trim the two shorter ends. Carefully pull the wrapped yarn over the cut ends to conceal them. Repeat at the other end. Even up the loose strands and tie them together with a loose knot. The fabric yarn’s stretch makes the necklace easy to put on and take off, but handle the finishing knots gently.
Wear and Care Tips
Adjust the center knots before tightening them completely to get the arrangement you want. Keep both ends balanced so the necklace hangs evenly. Since fabric yarn can stretch, avoid pulling hard on the cord when putting it on or removing it.
This finger-knit statement necklace makes a distinctive accessory and a handmade gift. The project is also portable, so it can be worked on during a quiet break or while traveling. —Rachel


