
 admin

Bleach painting on fabric is a simple way to create a custom design on a dark cotton-blend garment using household bleach made for fabric. In this project, textile contributor Jill of Lune demonstrates how to paint a design onto a tank top, including the phrase “We are made of stars.” With a few basic supplies and careful preparation, you can make your own pattern or lettering at home.
Supplies for Bleach Painting on Fabric
Gather everything before you begin so you can work steadily and deal with any drips right away. You will need:
- Fabric-safe household bleach
- An inexpensive synthetic-bristle paintbrush
- A glass or ceramic bowl
- A dark-colored cotton-blend top
- A white towel or rag
- White chalk
- A piece of cardboard
Choose a well-ventilated work area and protect the surrounding surface. Test the bleach on a hidden section of the garment first: fabric content and dye can affect the final color and result.
Important Bleach Safety
Bleach can irritate or injure skin and eyes. Keep it away from children, protect your eyes and clothing, and cover any abrasions. If your skin is sensitive, wear thin gloves. Never mix bleach with other cleaners, especially products containing ammonia or acids, and follow the product label. Keep the bowl stable and use the towel to catch accidental drips.
How to Paint a Shirt with Bleach
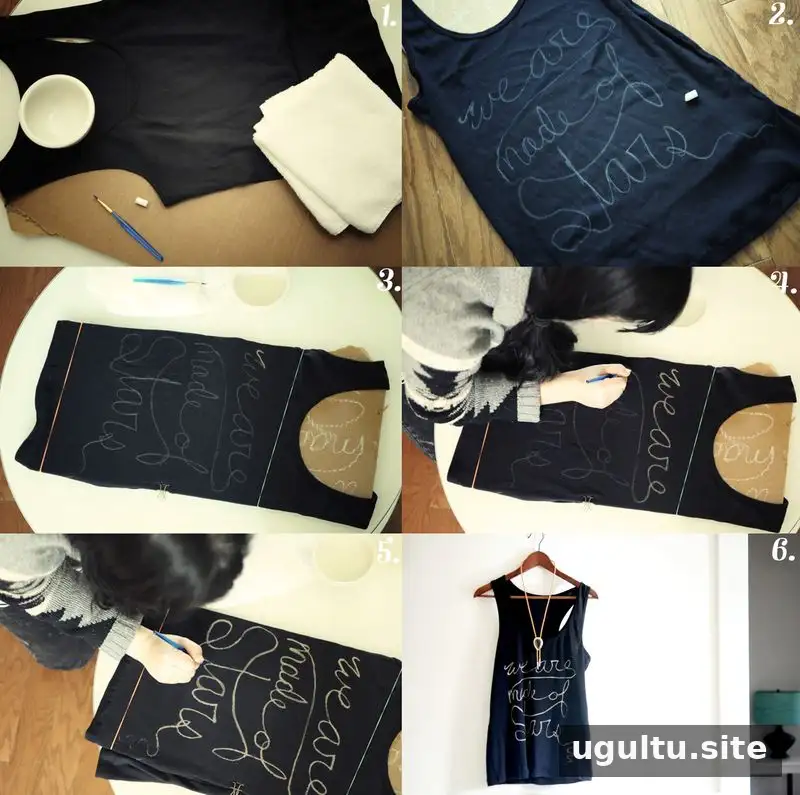
1. Slide a flat piece of cardboard inside the shirt. It creates a firm surface for painting and helps prevent bleach from reaching the back of the garment. Use white chalk to sketch your design. You can smudge and redraw the lines as needed; the chalk will wash out.
2. Fold the sides of the shirt around the cardboard and secure them with elastics or clips so the fabric does not shift. Pour a small amount of undiluted, fabric-safe bleach into a glass or ceramic bowl, following the product directions. Keep the towel within reach.
3. Dip the brush in the bleach, then draw it along the bowl’s edge to remove excess liquid and reduce drips. Trace the chalk lines with steady strokes. Reload the brush about every two inches to keep the line consistent. Work slowly and comfortably; the fabric absorbs the liquid quickly.
4. Finish tracing the design and give the bleach a few minutes to react. Check for uneven or lighter sections, then carefully touch them up with the brush if needed.
5. When you are happy with the result, leave the garment in the sun for an hour or longer to let the bleach continue processing. The final shade depends on the cotton content and dye, and may range from dark red or orange to pink or white. Check the fabric periodically rather than assuming every garment will lighten in the same way.
Rinse the shirt thoroughly, hand wash it, and hang it to dry. Once dry, follow the garment’s care instructions and wash it with similar colors. The design is created by removing color from the fabric, so the effect is permanent.
Design Ideas and Finishing Tips

Bleach painting works with more than lettering. Try stripes, dots, small repeated shapes, or a larger freeform design. You can also use the garment’s seams and stitching as a guide for arranging a pattern. Keep the first design simple if you are new to the technique, and use a scrap of similar fabric to practice brush pressure and spacing.

This bleach painting on fabric project offers a straightforward way to personalize a dark cotton-blend top. Plan the design in chalk, protect the work surface and garment layers, and handle bleach carefully. Because fabric dyes respond differently, a small test and a patient approach can help you get a result that suits your design.


