
 admin

Resist dyeing is a simple way to create distinctive patterns on fabric by tying or folding sections so they take up less color. Often associated with tie-dye, this technique works well for a cotton or linen circle scarf and is easy to adapt to different designs. Since each fabric bundle absorbs dye a little differently, every finished scarf will have its own pattern.
With a few basic supplies and careful attention to the dye instructions, you can make a lightweight cover-up for warm weather. Choose a scarf made from natural fibers and a dye suitable for that fabric for the best chance of achieving an even result.

Supplies for resist dyeing
Gather your materials before preparing the dye bath. Working with everything within reach makes it easier to keep the fabric moving through each step.
- A circle scarf made from cotton or linen
- Fabric dye suitable for the scarf’s fibers
- Rubber bands
- A glass or enamel pot
- A measuring cup and a spoon or tongs for stirring
- Salt, if required by the dye instructions
- Rubber gloves to help protect your hands
- An old towel to protect your work surface
- Access to a sink
Check the dye package before you begin. It will specify the water temperature, amounts and whether salt is needed. Use a pot dedicated to craft use if you do not want to use a cooking pot for dyeing.
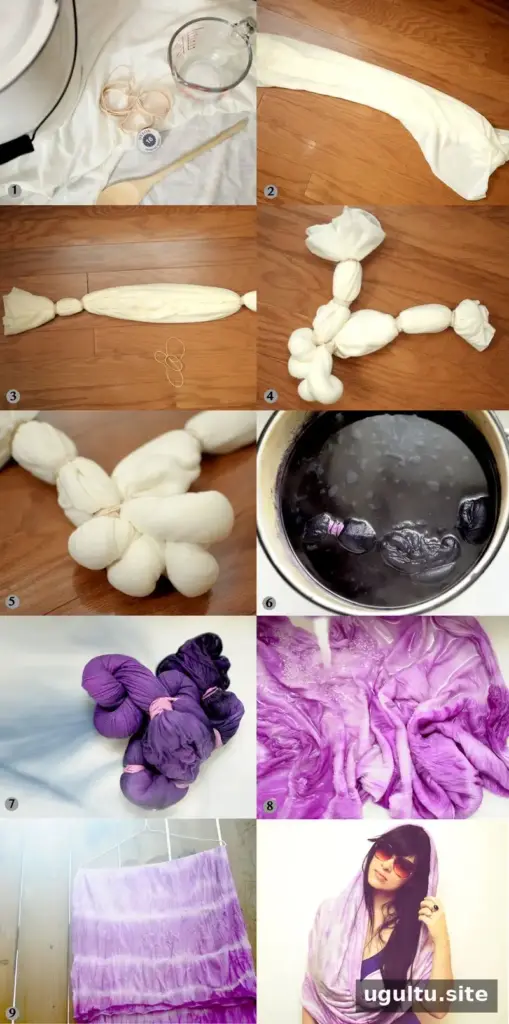
How to make a resist-dyed scarf
1. Tie the fabric to create a pattern
Lay the scarf flat and decide where you want the undyed areas to appear. Wrap rubber bands tightly around sections of fabric to create lines and stripes of the original scarf color. The tighter the bands hold the fabric, the more clearly those areas may resist the dye.
For a less regular pattern, twist the fabric firmly until it coils, then secure the coil with rubber bands. You can combine tied sections and a twisted coil to create a design with both defined lines and more irregular shapes.
2. Prepare the dye bath
Mix the dye according to its package directions, measuring the water and dye as instructed. Some dyes are made for hot water, while others use cold water. Add salt only if the product directions call for it. Following the recommended measurements helps the fabric dye more consistently and can reduce unwanted color transfer during washing.
3. Dye the scarf
Place the tied scarf into the prepared dye bath. Stir and turn it several times so the dye reaches the fabric and trapped air bubbles can escape. Leave the scarf in the bath for 20 to 40 minutes, depending on the dye being used and its instructions.
4. Rinse and remove the ties
Using gloves, carefully lift the scarf from the pot and place it in the sink. Rinse it with cool water to remove excess dye. Then unwind the rubber bands or cut them off carefully; bands that are removed intact can be reused.
5. Wash and dry
Hand wash the scarf in cool water or machine wash it to remove remaining dye. For the first wash, do not use detergent, and continue rinsing until the water runs clear. Squeeze out excess water gently, then hang the scarf to dry.
Care tips for a resist-dyed scarf
Dyed natural-fiber fabrics can gradually lose color with repeated washing. To help limit fading, hand wash the scarf and hang it to dry. If you use a washing machine, wash the newly dyed item by itself for its first cycle; afterward, wash it with similar colors.

Resist dyeing is a practical way to customize a scarf using simple ties, twists and fabric dye. Follow the product directions, rinse the finished piece thoroughly and handle it gently to help preserve its pattern and color. Have fun resist dyeing! — Jill


