
 admin


A Dutch braid is an inverted braid that sits visibly on top of the hair rather than blending into it. The technique is similar to French braiding, but the outer sections cross underneath the middle section. This creates a raised braid that can be gently loosened for a fuller appearance.
The style works on different hair lengths and textures, including mid-length hair and layered cuts. For a neater result, start with detangled hair and keep the sections even as you braid. If you prefer a relaxed finish, you can loosen the braid slightly once it is secured.
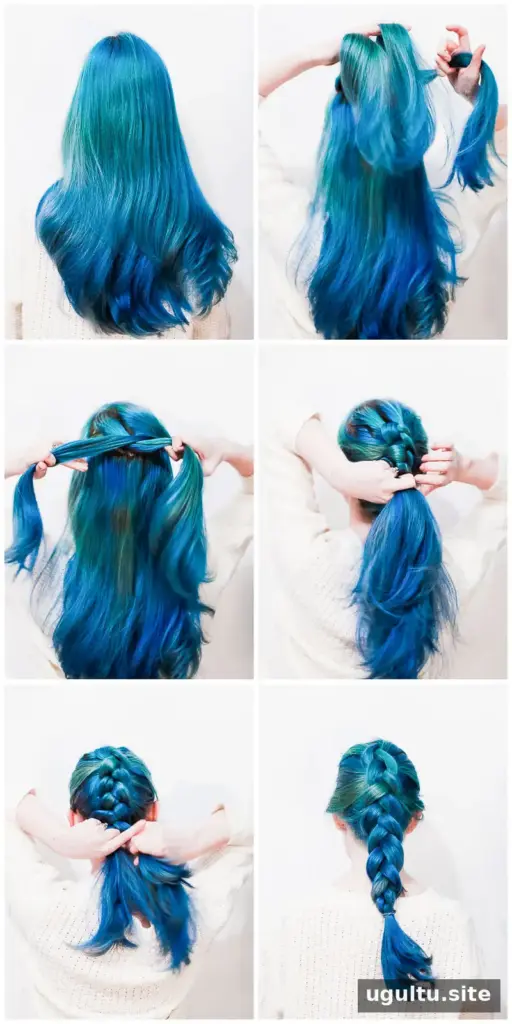
How to Make a Dutch Braid
Follow these steps to braid from the front of your head toward the ends. Keep the braid close to the scalp as you add hair, and use consistent tension so it stays secure without pulling uncomfortably.
- Section the hair: Take a small triangular section near the front of your head and divide it into three equal strands.
- Begin the braid: Cross the right outer strand underneath the middle strand. Then cross the left outer strand underneath the new middle strand. Passing the strands underneath is what gives a Dutch braid its raised look.
- Add hair as you go: Before crossing the right strand under the middle, gather a small amount of loose hair and add it to the right strand. Repeat on the left, adding hair before crossing that strand underneath.
- Continue to the ends: Keep alternating sides and adding sections until all the hair you want included has been incorporated. Braid the remaining length and secure the end with a small elastic.
- Adjust the finish: Leave the braid neat or gently pull its outer loops outward to make it look wider. If using texturizing spray, apply it sparingly and follow the product instructions; a light touch helps avoid weighing the hair down.
Dutch Braid Tips for a Fuller Look
Loosening the braid, sometimes called pancaking, can make it appear thicker. Work gradually from the top toward the ends, easing out small sections rather than tugging hard. This helps preserve the braid’s shape and reduces the chance of strands slipping free.
For layered or shorter hair, keep the sections relatively small and secure loose ends with pins if needed. A slightly undone finish can also suit layers that do not stay tucked into the braid. If the hair feels slippery, starting with dry, detangled hair may make it easier to control the sections.

Dutch Braid and French Braid: The Difference
Both styles add hair progressively as the braid moves along the head. The main difference is the direction of the crossover: in a French braid, the outer sections pass over the middle; in a Dutch braid, they pass underneath. That small change makes the Dutch braid stand out in relief.
Once comfortable with the technique, try making a braid on each side for double Dutch braids. Use a centre part and work through one side at a time, checking that the sections are similar in size for a balanced result.
A Dutch braid is a versatile option for a polished or casual hairstyle, and it can still work when a few layers fall loose. With even sections, underhand crossings and gentle shaping, the braid can look defined and full. — Rebecca


